Zabbix 6.4インストール手順(RHEL9 / Apache2.4 / PHP-FPM8.0 / MySQL8.0)
Contents
はじめに
2023年3月7日、Zabbix 6.4がリリースされました。以下公式サイトに主な変更内容がまとめられています。
今回は、ミドルウェア構成としてApache + PHP-FPM + MySQLでZabbix Server 6.4およびZabbix Agent2 6.4のインストールを検証してみました。OSはRed Hat Enterprise Linux(以下 RHEL) 9.1を使用しています。下記ページでRed Hat系ディストリビューションとして選択肢にあるAlmaLinuxやOracle Linux、CentOS Streamでも同様の設定で動作する想定です。
Download and install Zabbix
前提条件
以下の前提条件で検証しています。
- ハードウェア: VirtualBox上の仮想マシン
- OS: Red Hat Enterprise Linux 9.1
- ミドルウェア:
- Apache: 2.4.53 (OS同梱版)
- PHP-FPM: 8.0.27 (OS同梱版)
- MySQL: 8.0.30 (OS同梱版)
- Zabbix Server: 6.4.0
- Zabbix Agent 2: 6.4.0
- 構築対象サーバはインターネットと疎通が取れること
- 各手順はroot権限を持つユーザで実施
RHEL 9は、以下記事の手順をベースにRed Hat Developer Subscription for Individualsを使用してサブスクリプション登録が完了している状態から作業を始めます。RHEL 8向けの記事ですがRHEL 9でも同様です。
【RHEL 8】Subscription Managerでサブスクリプションの登録・解除
OSは、RHELインストールDVDのISOファイルから「最小限のインストール」を選択しインストールを行いました。
バージョン情報は以下の通りです。
# cat /etc/redhat-release
Red Hat Enterprise Linux release 9.1 (Plow)
# uname -r
5.14.0-162.6.1.el9_1.x86_64
パッケージインストール
Zabbix Server
サーバにEPELリポジトリをインストールしている場合、同リポジトリ提供のパッケージとZabbixリポジトリのパッケージが競合しないように事前に設定が必要です。
viなどのテキストエディタで、Yumリポジトリの設定ファイルを開きます。
# vi /etc/yum.repos.d/epel.repo
変更内容は以下の通りです。zabbixから始まるパッケージをepelから取得しないようにします。
[epel]
...
excludepkgs=zabbix*
次に、Zabbix 6.4の公式リポジトリをインストールします。
Zabbixのリリース状況によっては、新しいバージョンのパッケージが公開される可能性があります。以下の公式リポジトリで、zabbix-release-6.4-x.el8.noarch.rpmのバージョンを確認してください。新しいバージョンが公開されている場合は、インストール対象パッケージのURLを適宜変更してください。
https://repo.zabbix.com/zabbix/6.4/rhel/9/x86_64/
# dnf install -y https://repo.zabbix.com/zabbix/6.4/rhel/9/x86_64/zabbix-release-6.4-1.el9.noarch.rpm
Zabbix Serverの関連パッケージをインストールします。
# dnf install -y zabbix-server-mysql zabbix-web-mysql zabbix-web-japanese zabbix-apache-conf zabbix-sql-scripts zabbix-selinux-policy mysql-server
Zabbix Agent 2
Zabbix Agent 2をインストールします。
# dnf install -y zabbix-agent2
設定ファイルの変更
Zabbix Server
viなどのテキストエディタで、Zabbix Serverの設定ファイルを開きます。
# vi /etc/zabbix/zabbix_server.conf
設定変更内容は以下の通りです。最低限の設定として、DBサーバへの接続情報が必要です。
### DB関連の設定 ###
# DB名
# 今回はデフォルトのzabbixを使用するので変更しない

DBName=zabbix

# DBユーザ名
# 今回はデフォルトのzabbixを使用するので変更しない

DBUser=zabbix

# DBパスワード
# 項目のコメントアウトを外し、クオートやスペースを含めずに指定する
# 今回は、パスワード設定例としてzabbixpassを指定

# DBPassword=
↓
DBPassword=zabbixpass
Zabbix Agent2
viなどのテキストエディタで、Zabbix Agent 2の設定ファイルを開きます。
# vi /etc/zabbix/zabbix_agent2.conf
設定変更内容は以下の通りです。監視を受け付けるサーバに関する設定を行います。
# 監視通信を許可するサーバIPアドレス
# Zabbixサーバ自身を監視する場合は値を変更しない
# 別サーバへエージェントをインストールする場合は、通信元ZabbixサーバのIPアドレスを指定する

Server=127.0.0.1

# アクティブチェック監視データの送信先サーバIPアドレス
# Zabbixサーバ自身を監視する場合は値を変更しない
# 別サーバへエージェントをインストールする場合は、送信先ZabbixサーバのIPアドレスを指定する

ServerActive=127.0.0.1

# 自ホスト名
# OS上のホスト名ではなく、Zabbix監視設定上のホスト名なので注意
# 以下の例では、監視設定上のホスト名をzbx01に指定している

Hostname=Zabbix server
↓
Hostname=zbx01
DBの設定
DBの設定を行うため、MySQLの自動起動設定とサービスの起動を行います。
# systemctl enable --now mysqld.service
Created symlink /etc/systemd/system/multi-user.target.wants/mysqld.service → /usr/lib/systemd/system/mysqld.service.
MySQLの初期設定を行います。
なお、MySQL 8.0ではパスワードポリシーの指定があります。Please enter 0 = LOW, 1 = MEDIUM and 2 = STRONG:の箇所で、以下のポリシーを選択できます。
- 0: 8文字以上
- 1: 8文字以上、英数大文字、小文字、記号を全て含む
- 2: 8文字以上、英数大文字、小文字、記号、辞書ファイルの指定文字列を全て含む
設定例中のDBユーザrootのパスワードは、パスワードポリシーを0(LOW)、パスワード文字列にrootpassを指定します。
# mysql_secure_installation
(略)
VALIDATE PASSWORD COMPONENT can be used to test passwords
and improve security. It checks the strength of password
and allows the users to set only those passwords which are
secure enough. Would you like to setup VALIDATE PASSWORD component?

Press y|Y for Yes, any other key for No: y ←yを入力
(略)
Please enter 0 = LOW, 1 = MEDIUM and 2 = STRONG: 0 ←0を入力
(略)
New password: ←DBユーザrootのパスワードを入力

Re-enter new password: ←再度DBユーザrootのパスワードを入力
(略)
Do you wish to continue with the password provided?(Press y|Y for Yes, any other key for No) : y ←yを入力
(略)
Remove anonymous users? (Press y|Y for Yes, any other key for No) : y ←yを入力
(略)
Disallow root login remotely? (Press y|Y for Yes, any other key for No) : y ←yを入力
(略)
Remove test database and access to it? (Press y|Y for Yes, any other key for No) : y ←yを入力
(略)
Reload privilege tables now? (Press y|Y for Yes, any other key for No) : y ←yを入力
Success.

All done!
Zabbix用のデータベースとDBユーザを作成します。
設定例中のCREATE USERの箇所はZabbix Serverの設定ファイルに合わせて、DBユーザzabbixのパスワード文字列としてzabbixpassを指定します。
# mysql -u root -p
Enter password:  ←DBユーザrootのパスワードを入力
(略)
mysql> CREATE DATABASE zabbix CHARACTER SET utf8mb4 COLLATE utf8mb4_bin;
Query OK, 1 row affected (0.00 sec)

mysql> CREATE USER zabbix@localhost IDENTIFIED BY 'zabbixpass';
Query OK, 0 rows affected (0.01 sec)

mysql> GRANT ALL PRIVILEGES ON zabbix.* TO zabbix@localhost;
Query OK, 0 rows affected (0.00 sec)

mysql> SET GLOBAL log_bin_trust_function_creators = 1;
Query OK, 0 rows affected (0.00 sec)

mysql> quit;
Bye
Zabbix用のDBスキーマと初期データをデータベースに読み込みます。サーバのスペックによっては、この処理は数十秒〜数分かかります。
# zcat /usr/share/zabbix-sql-scripts/mysql/server.sql.gz | mysql --default-character-set=utf8mb4 -uzabbix -p zabbix
Enter password:  ←DBユーザzabbixのパスワードを入力
DBスキーマと初期データの読み込みが完了したら、MySQLのlog_bin_trust_function_creatorsを無効化します。
# mysql -u root -p
Enter password:  ←DBユーザrootのパスワードを入力
(略)
mysql> SET GLOBAL log_bin_trust_function_creators = 0;
Query OK, 0 rows affected (0.00 sec)

mysql> quit;
Bye
SELinuxの設定(ブール値の有効化)
SELinuxが有効な場合、Zabbixに関するセキュリティポリシーを設定します。
まずは、Zabbixインストール時自動的に追加されるブール値の状態を確認します。
# semanage boolean -l | grep zabbix
httpd_can_connect_zabbix       (オフ   ,   オフ)  Allow httpd to can connect zabbix
zabbix_can_network             (オフ   ,   オフ)  Allow zabbix to can network
zabbix_run_sudo                (オフ   ,   オフ)  Allow zabbix to run sudo
最低限の通信が行えるよう、httpd_can_connect_zabbixとzabbix_can_networkを有効化します。
# setsebool -P httpd_can_connect_zabbix on
# setsebool -P zabbix_can_network on
zabbix_run_sudoは、Zabbix Serverでsudoコマンドの発行要件がある場合に有効化します。
ファイアウォールの設定
Firewalldを使用する場合、外部からの通信を許可します。許可対象の通信は以下の通りです。
- 10050/tcp : Zabbix Server → Zabbix Agentのパッシブ監視通信(Zbbixサーバ自身は不要、監視対象サーバでは必要)
- 10051/tcp : Zabbix Agent → Serverのアクティブ監視通信(Zabbixサーバのみ必要)
- http : クライアント → Zabbix WebUIのHTTP通信(Zabbixサーバのみ必要)
# firewall-cmd --add-port=10051/tcp --zone=public --permanent
success
# firewall-cmd --add-service=http --zone=public --permanent
success
# firewall-cmd --reload
success
Zabbix WebUIのSSL化(https)や、SNMP Trapの受信(162/udp)など、Zabbixサーバに対する上記以外のインバウンド通信要件がある場合は、適宜Firewalldの設定を追加してください。
サービス起動
Apache
Apacheの自動起動設定とサービス起動を行います。
# systemctl enable --now httpd.service
Created symlink /etc/systemd/system/multi-user.target.wants/httpd.service → /usr/lib/systemd/system/httpd.service.
PHP-FPM
PHP-FPMの自動起動設定とサービス起動を行います。
# systemctl enable --now php-fpm.service
Created symlink /etc/systemd/system/multi-user.target.wants/php-fpm.service → /usr/lib/systemd/system/php-fpm.service.
Zabbix Server
Zabbix Serverの自動起動設定とサービス起動を行います。
# systemctl enable --now zabbix-server.service
Created symlink /etc/systemd/system/multi-user.target.wants/zabbix-server.service → /usr/lib/systemd/system/zabbix-server.service.
Zabbix Agent2
Zabbix Agent2の自動起動設定とサービス起動を行います。
# systemctl enable --now zabbix-agent2
Created symlink /etc/systemd/system/multi-user.target.wants/zabbix-agent2.service → /usr/lib/systemd/system/zabbix-agent2.service.
サービス起動確認
Zabbixを構成している全サービスが起動していることを確認します。各サービスがActive: active (running)になっていれば正常に起動しています。
# systemctl status \
  httpd.service \
  php-fpm.service \
  mysqld.service \
  zabbix-server.service \
  zabbix-agent2.service \
  | grep -E "(●|Active:)"

● httpd.service - The Apache HTTP Server
   Active: active (running) since Wed 2022-02-16 00:48:19 JST; 1min 20s ago
● php-fpm.service - The PHP FastCGI Process Manager
   Active: active (running) since Wed 2022-02-16 00:48:19 JST; 1min 21s ago
● mysqld.service - MySQL 8.0 database server
   Active: active (running) since Wed 2022-02-16 00:27:45 JST; 21min ago
● zabbix-server.service - Zabbix Server
   Active: active (running) since Wed 2022-02-16 00:49:08 JST; 32s ago
● zabbix-agent2.service - Zabbix Agent 2
   Active: active (running) since Wed 2022-02-16 00:49:15 JST; 25s ago
WebUIの設定
初期設定ウィザード
WebUIの初期設定を行うため、作業端末のWebブラウザを起動して以下のURLにアクセスします。
http://<ZabbixサーバIPアドレス>/zabbix/
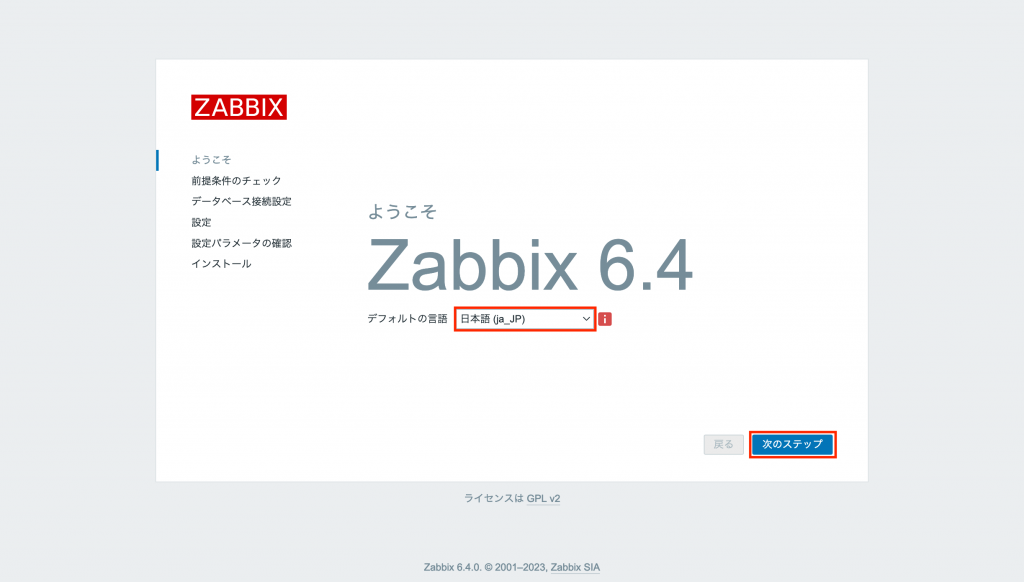
「デフォルトの言語」の箇所に、「日本語 (ja_JP)」を選択します。
言語表示が日本語に切り替わるので、「次のステップ」を押下します。
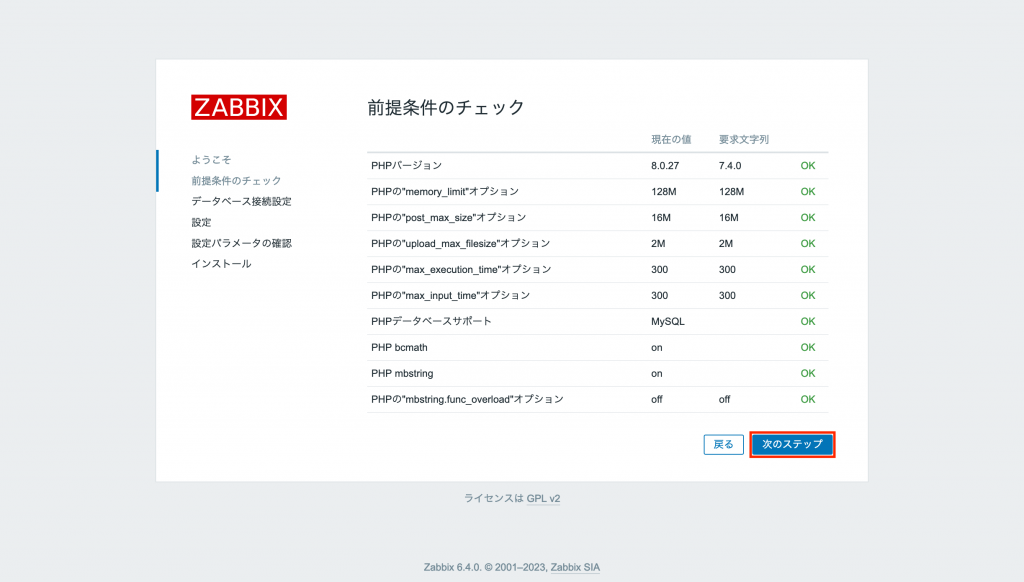
全ての項目が「OK」になっていることを確認して、「次のステップ」を押下します。
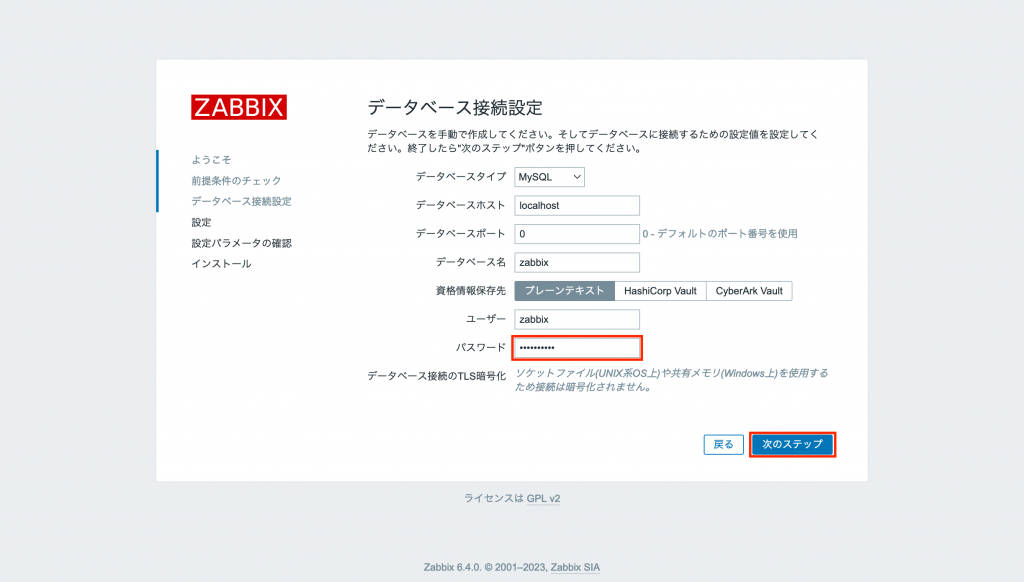
DBの認証情報はHashiCorp VaultやCyberArk Vaultから取得することも可能ですが、今回は「プレーンテキスト」を選択してZabbix自身に認証情報の設定を行います。
「パスワード」の箇所に、DBユーザzabbixのパスワードを入力し、「次のステップ」を押下します。
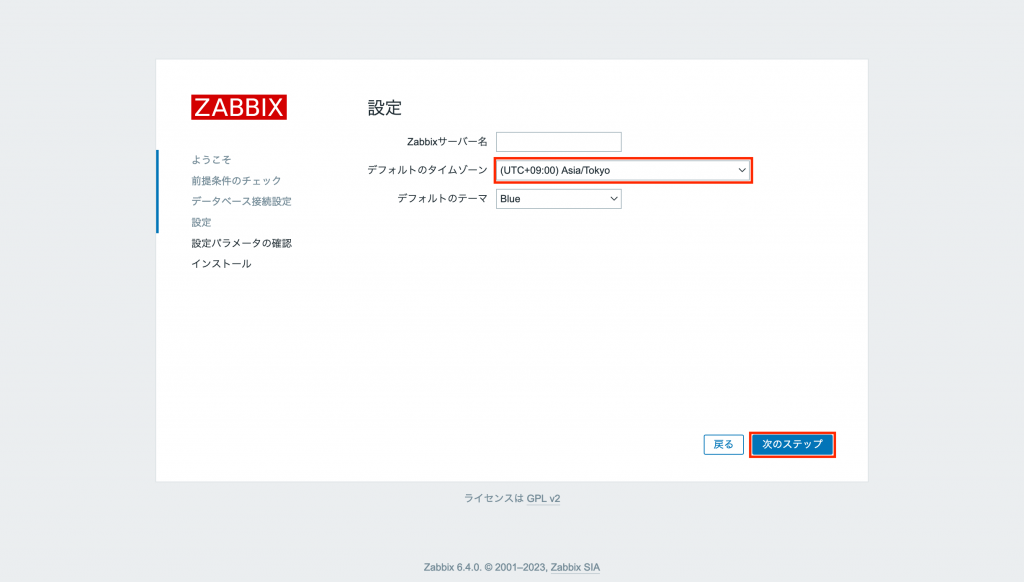
「デフォルトのタイムゾーン」の箇所に、「(UTC+09:00) Asia/Tokyo」を選択します。
「次のステップ」を押下します。
「次のステップ」を押下します。
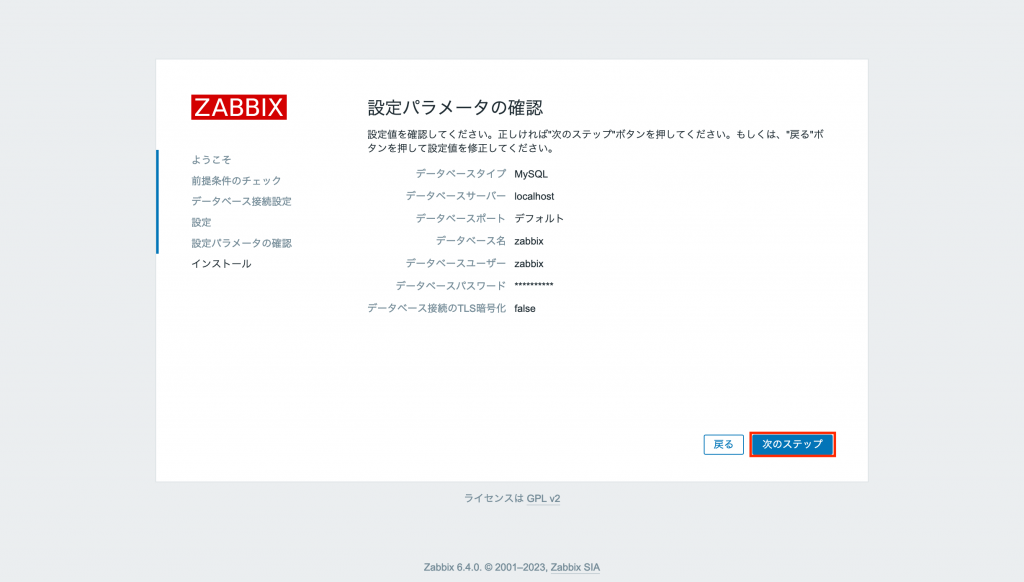
「終了」を押下します。
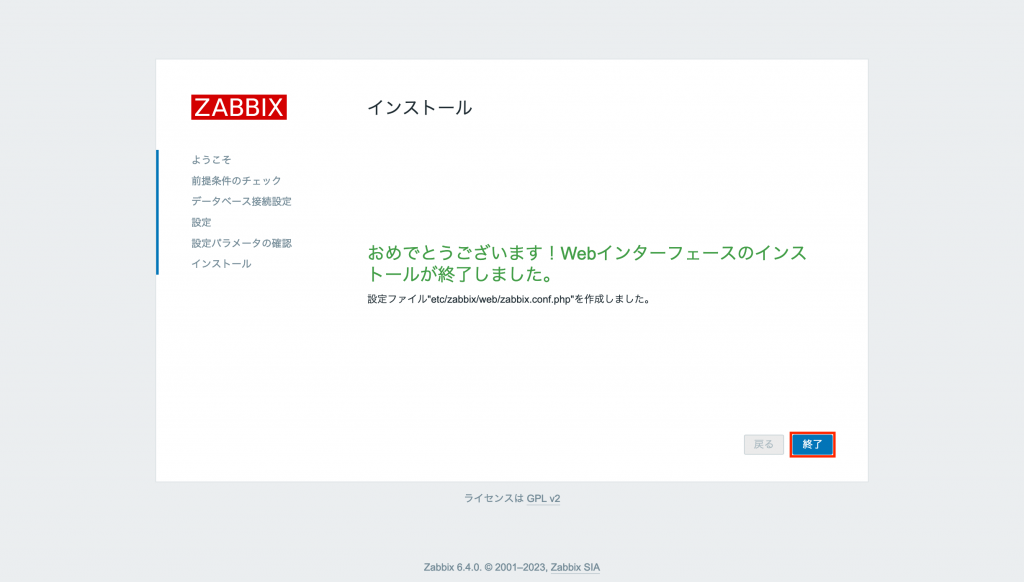
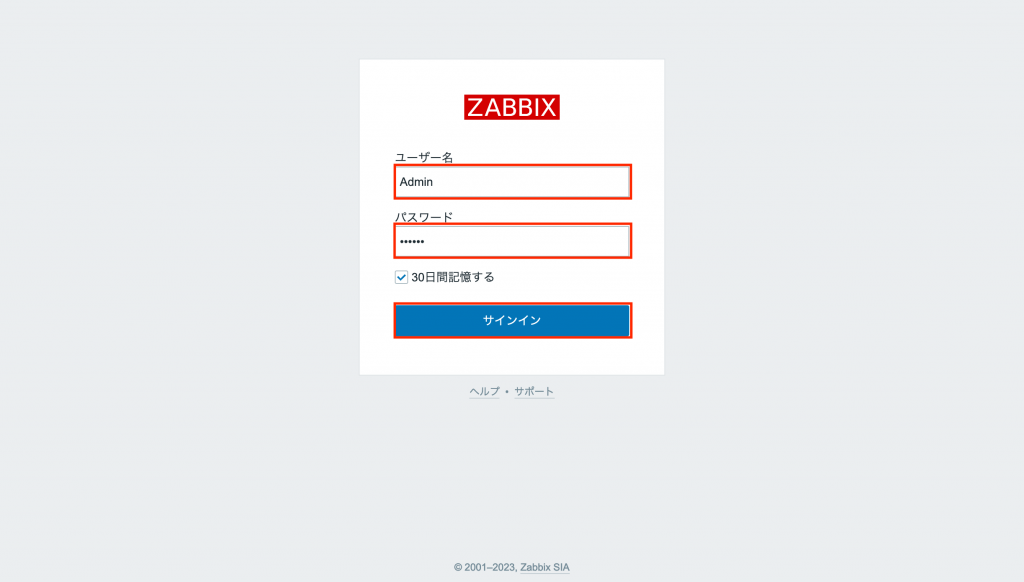
設定が完了すると、ログイン画面に遷移します。
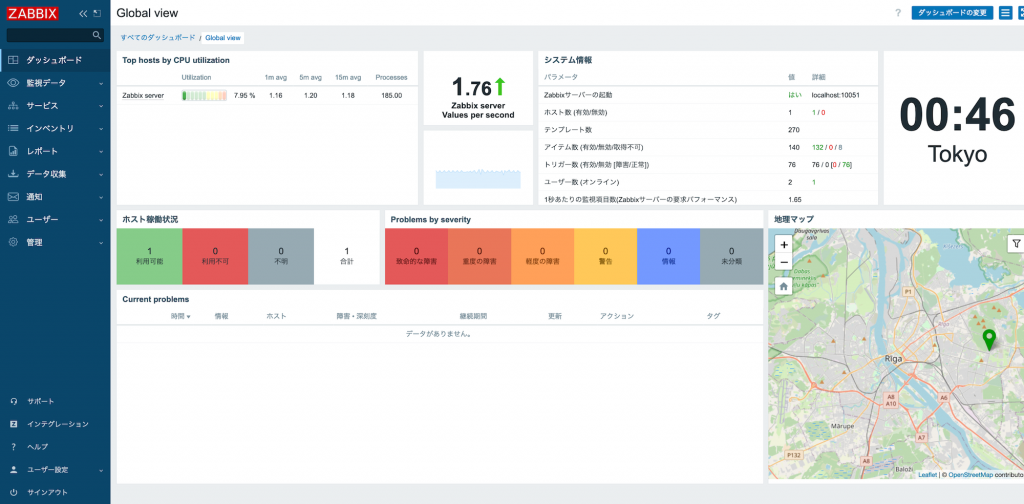
初期ユーザ名「Admin」、初期パスワード「zabbix」を入力し、「サインイン」を押下します。
ダッシュボードが表示されることを確認し、WebUIの初期設定は完了です。
参考情報
Zabbixインストール時の依存パッケージについて
Zabbixの主要パッケージをインストールするときに要求される依存関係パッケージ一覧を採取しました。
オフライン環境でZabbixをインストールする場合、以下のパッケージファイルを用意しておく必要があります。
Zabbixリポジトリのパッケージは、インターネット上から直接ダウンロードしてサーバに転送しておきます。BaseOS、AppStreamリポジトリのパッケージは、OSインストールイメージのISOファイルをマウントしてyumリポジトリに登録することでインストールができます。
# dnf install zabbix-server-mysql zabbix-web-mysql zabbix-web-japanese zabbix-apache-conf zabbix-sql-scripts zabbix-selinux-policy
(略)
================================================================================
 パッケージ    Arch   バージョン         リポジトリー                     サイズ
================================================================================
インストール:
 zabbix-apache-conf
               noarch 6.4.0-release1.el9 zabbix                            13 k
 zabbix-selinux-policy
               x86_64 6.4.0-release1.el9 zabbix                           259 k
 zabbix-server-mysql
               x86_64 6.4.0-release1.el9 zabbix                           1.7 M
 zabbix-sql-scripts
               noarch 6.4.0-release1.el9 zabbix                           7.1 M
 zabbix-web-japanese
               noarch 6.4.0-release1.el9 zabbix                            12 k
 zabbix-web-mysql
               noarch 6.4.0-release1.el9 zabbix                            12 k
依存関係のインストール:
 OpenIPMI-libs x86_64 2.0.32-3.el9       rhel-9-for-x86_64-appstream-rpms 518 k
 apr           x86_64 1.7.0-11.el9       rhel-9-for-x86_64-appstream-rpms 127 k
 apr-util      x86_64 1.6.1-20.el9       rhel-9-for-x86_64-appstream-rpms  98 k
 apr-util-bdb  x86_64 1.6.1-20.el9       rhel-9-for-x86_64-appstream-rpms  15 k
 dejavu-sans-fonts
               noarch 2.37-18.el9        rhel-9-for-x86_64-baseos-rpms    1.3 M
 fontconfig    x86_64 2.14.0-2.el9_1     rhel-9-for-x86_64-appstream-rpms 301 k
 fonts-filesystem
               noarch 1:2.0.5-7.el9.1    rhel-9-for-x86_64-baseos-rpms     11 k
 fping         x86_64 5.1-1.el9          zabbix-non-supported              35 k
 freetype      x86_64 2.10.4-9.el9       rhel-9-for-x86_64-baseos-rpms    391 k
 gd            x86_64 2.3.2-3.el9        rhel-9-for-x86_64-appstream-rpms 134 k
 graphite2     x86_64 1.3.14-9.el9       rhel-9-for-x86_64-baseos-rpms     98 k
 harfbuzz      x86_64 2.7.4-8.el9        rhel-9-for-x86_64-baseos-rpms    629 k
 httpd         x86_64 2.4.53-7.el9_1.1   rhel-9-for-x86_64-appstream-rpms  53 k
 httpd-core    x86_64 2.4.53-7.el9_1.1   rhel-9-for-x86_64-appstream-rpms 1.5 M
 httpd-filesystem
               noarch 2.4.53-7.el9_1.1   rhel-9-for-x86_64-appstream-rpms  17 k
 httpd-tools   x86_64 2.4.53-7.el9_1.1   rhel-9-for-x86_64-appstream-rpms  87 k
 jbigkit-libs  x86_64 2.1-23.el9         rhel-9-for-x86_64-appstream-rpms  56 k
 langpacks-core-font-en
               noarch 3.0-16.el9         rhel-9-for-x86_64-appstream-rpms  11 k
 libX11        x86_64 1.7.0-7.el9        rhel-9-for-x86_64-appstream-rpms 648 k
 libX11-common noarch 1.7.0-7.el9        rhel-9-for-x86_64-appstream-rpms 210 k
 libXau        x86_64 1.0.9-8.el9        rhel-9-for-x86_64-appstream-rpms  34 k
 libXpm        x86_64 3.5.13-8.el9_1     rhel-9-for-x86_64-appstream-rpms  60 k
 libjpeg-turbo x86_64 2.0.90-6.el9_1     rhel-9-for-x86_64-appstream-rpms 178 k
 libpng        x86_64 2:1.6.37-12.el9    rhel-9-for-x86_64-baseos-rpms    119 k
 libtiff       x86_64 4.4.0-5.el9_1      rhel-9-for-x86_64-appstream-rpms 199 k
 libtool-ltdl  x86_64 2.4.6-45.el9       rhel-9-for-x86_64-appstream-rpms  39 k
 libwebp       x86_64 1.2.0-3.el9        rhel-9-for-x86_64-appstream-rpms 282 k
 libxcb        x86_64 1.13.1-9.el9       rhel-9-for-x86_64-appstream-rpms 247 k
 libxslt       x86_64 1.1.34-9.el9       rhel-9-for-x86_64-appstream-rpms 247 k
 mailcap       noarch 2.1.49-5.el9       rhel-9-for-x86_64-baseos-rpms     35 k
 mariadb-connector-c
               x86_64 3.2.6-1.el9_0      rhel-9-for-x86_64-appstream-rpms 203 k
 mariadb-connector-c-config
               noarch 3.2.6-1.el9_0      rhel-9-for-x86_64-appstream-rpms  11 k
 net-snmp-libs x86_64 1:5.9.1-7.el9_0.1  rhel-9-for-x86_64-appstream-rpms 762 k
 nginx-filesystem
               noarch 1:1.20.1-13.el9    rhel-9-for-x86_64-appstream-rpms  13 k
 oniguruma     x86_64 6.9.6-1.el9.5      rhel-9-for-x86_64-appstream-rpms 221 k
 php-bcmath    x86_64 8.0.27-1.el9_1     rhel-9-for-x86_64-appstream-rpms  38 k
 php-common    x86_64 8.0.27-1.el9_1     rhel-9-for-x86_64-appstream-rpms 686 k
 php-fpm       x86_64 8.0.27-1.el9_1     rhel-9-for-x86_64-appstream-rpms 1.6 M
 php-gd        x86_64 8.0.27-1.el9_1     rhel-9-for-x86_64-appstream-rpms  43 k
 php-ldap      x86_64 8.0.27-1.el9_1     rhel-9-for-x86_64-appstream-rpms  43 k
 php-mbstring  x86_64 8.0.27-1.el9_1     rhel-9-for-x86_64-appstream-rpms 473 k
 php-mysqlnd   x86_64 8.0.27-1.el9_1     rhel-9-for-x86_64-appstream-rpms 154 k
 php-pdo       x86_64 8.0.27-1.el9_1     rhel-9-for-x86_64-appstream-rpms  87 k
 php-xml       x86_64 8.0.27-1.el9_1     rhel-9-for-x86_64-appstream-rpms 138 k
 redhat-logos-httpd
               noarch 90.4-1.el9         rhel-9-for-x86_64-appstream-rpms  18 k
 unixODBC      x86_64 2.3.9-4.el9        rhel-9-for-x86_64-appstream-rpms 495 k
 xml-common    noarch 0.6.3-58.el9       rhel-9-for-x86_64-appstream-rpms  36 k
 zabbix-web    noarch 6.4.0-release1.el9 zabbix                           7.6 M
 zabbix-web-deps
               noarch 6.4.0-release1.el9 zabbix                            13 k
弱い依存関係のインストール:
 apr-util-openssl
               x86_64 1.6.1-20.el9       rhel-9-for-x86_64-appstream-rpms  17 k
 mod_http2     x86_64 1.15.19-2.el9      rhel-9-for-x86_64-appstream-rpms 153 k
 mod_lua       x86_64 2.4.53-7.el9_1.1   rhel-9-for-x86_64-appstream-rpms  63 k

トランザクションの概要
================================================================================
インストール  58 パッケージ

ダウンロードサイズの合計: 29 M
インストール後のサイズ: 105 M
(略)
Zabbix Agent 2の依存関係にあるパッケージは以下の通りです。
# dnf install zabbix-agent2
(略)
================================================================================
 パッケージ          Arch         バージョン                 リポジトリー サイズ
================================================================================
インストール:
 zabbix-agent2       x86_64       6.4.0-release1.el9         zabbix       5.3 M

トランザクションの概要
================================================================================
インストール  1 パッケージ

ダウンロードサイズの合計: 5.3 M
インストール後のサイズ: 18 M
(略)
